


/idata%2F0396584%2FKOREA%2F71910_korea_MIA1_800.JPG)
/idata%2F0396584%2FU.S.ARMY-POST-WW2%2Fphot4901a.jpg)
/idata%2F0396584%2FDRAWINGS-UNIFORMS-WW2%2F30-451-09b-2.jpg)
/idata%2F0396584%2FP-40%2F44FS000.jpg)
/idata%2F0396584%2FGERMAN-U-BOAT%2FBundesarchiv_Bild_101II-MW-1031-28-_Lorient-_U-31.jpg)
/idata%2F0396584%2FSOVIET-ARMY-WW2%2F1.jpg)


![]()

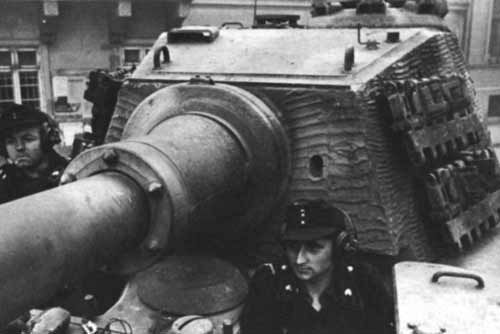
PzKpfw VI Ausf. B. Tiger II
Tiger II is the common name of a a German heavy tank of the Second World War. The official German designation was Panzerkampfwagen VI Ausf. B and the tank also had the ordnance inventory designation SdKfz 182. It is also known under the informal name Königstiger (German: Bengal Tiger), often literally translated as King Tiger and by the British as Royal Tiger.
The Tiger II combined the heavy armor of the Tiger I with the sloped armor of the Panther. The design followed the same concept as the Tiger I, but was intended to be even more formidable. The Tiger II chassis supplied the basis for the Jagdtiger turretless tank destroyer.
The Tiger II weighed 68.5 (early turret) to 69.8 (production turret) tonnes, was protected by 150 to 180 mm of frontal armor, and was armed with the 88 mm KwK 43 L/71 gun.
The very heavy armor and powerful long-range gun gave the Tiger II the advantage against virtually all opposing tanks. This was especially true on the Western Front, where the British and U.S. forces had almost no heavy tanks with which to oppose it. In a defensive position it was difficult to destroy. Offensively it performed with less success, and its performance was a great disappointment to Hitler[citation needed] when it first saw action.
The Tiger II performed very well against Allied and Soviet tanks being able to penetrate the front armour of the M4 Sherman, M26 Pershing and IS-2 at respectively 2500 m, 1800 m and 1200 m. Defensewise the M4 Sherman was unable to penetrate the front even at point blank and the M26 Pershing and IS-2 had to come within 1300 m and 200 m respectively.
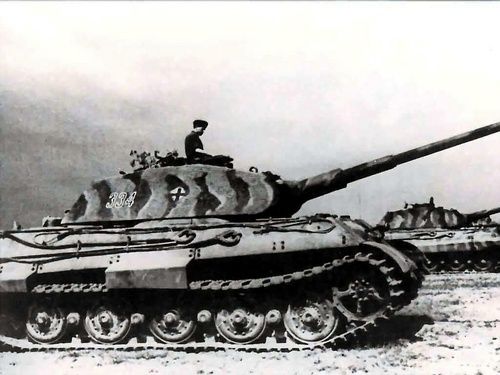
The Tiger II was widely photographed due to its large size and propaganda value.
Development
Initially two designs were provided, one by Henschel and one by Porsche. Both used a turret design from Krupp; the main differences were in the hull design, transmission and suspension.
The Henschel version used a conventional hull design with sloped armor resembling the layout of the Panther tank. It had a rear mounted engine and standard interleaved road wheels mounted on transverse torsion bars in a similar manner to the original Tiger. To simplify maintenance, however, the wheels were overlapping rather than interleaved as in the Tiger I.
The Porsche hull design had a rear-mounted turret and a mid mounted engine. The suspension was the same as on the Jagdpanzer Elefant. This suspension had six road wheels per side mounted in paired bogies sprung with short longitudinal torsion bars that were integral to the wheel pair; this saved internal space and facilitated repairs.
The Porsche version had a series-hybrid power system where the gasoline engines powered electrical generators which in turned powered electric motors which turned the sprockets. This method of propulsion had been attempted before on the Ferdinand prototypes and in some U.S. designs, but had never been put into production. The Porsche suspension would later be used on a few of the later Jagdtiger tank hunters.
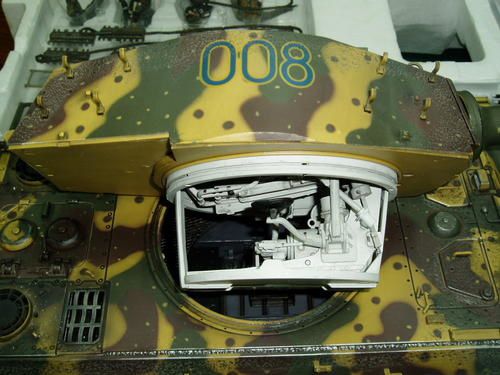

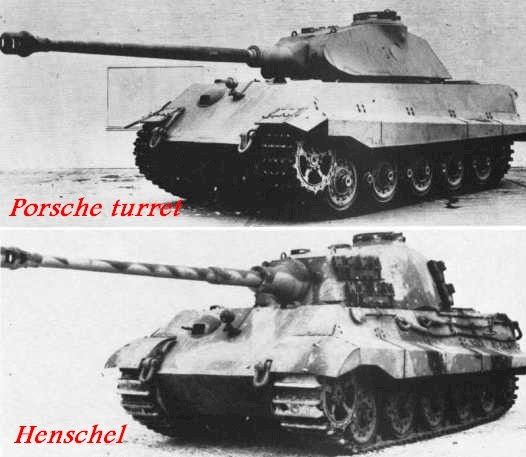
Henschel won the contract, and all Tiger IIs were produced by the firm. Two turret designs were used in production vehicles. The initial design is sometimes misleadingly called the "Porsche turret" due to the belief that it was designed by Porsche for their prototype. In fact this turret was simply the initial Krupp design for both prototypes.
This turret had a rounded front and steeply sloped sides, with a difficult-to-manufacture curved bulge to accommodate the commander's cupola. Fifty early turrets were mounted to Henschel's hull and used in action.
The more common "production" turret, sometimes called the "Henschel" turret, was simplified with a flat face, no shot trap (created by the curved face of the initial-type turret), less-steeply sloped sides, and no bulge for the commander's cupola.
The track system used on the Tiger II chassis was a unique one, which used alternating "contact shoe" and "connector" links—the contact shoe link had a pair of transverse metal bars that contacted the ground, while the connector links had no contact with the ground.
The Tiger II was developed late in the war and made in relatively small numbers. Like all German tanks, it had a gasoline engine. However, this same engine powered the much lighter Panther and Tiger I tanks. The Tiger II was under-powered, like many heavy tanks of WW2, and consumed a lot of fuel which was already in short supply.
Mechanical problems
With the Third Reich hard pressed, the Tiger IIs were sent directly from the factories into combat. As a result of the abandonment of post-production testing and preliminary trials, the tanks had numerous technical issues. Notably, the steering control would often break down under the stress of the vehicle's weight. In addition, not only were the engines prone to overheating and failure, but they also consumed large amounts of fuel.
This can be attributed to the fact that it used the 690 hp Maybach engine of the far smaller Panther tank. The engine had to constantly run at full power just to get the tank moving. Henschel & Son's chief designer Erwin Adlers explained that "The breakdowns can be attributed to the fact that the Tiger II had to go straight into series production without the benefit of test results." The engine and drivetrain was overburdened by the weight and would have required more testing to work out problems, a common problem among heavy tanks that pushed the limits of powerplants and transmissions.
A version of the Maybach HL230 engine with direct fuel injection was being designed that would have improved power to about 1,000 PS (986 hp, 736 kW), Henschel proposed to use it for future production and retrofitting to existing Tiger IIs, but the deteriorating war situation meant the upgrade never left the drawing board. Other suggested improvements included a new main weapon, possibly of 105 mm calibre, but again this never got beyond the proposal stage.
Overall, the Tiger II was a formidable tank in spite of its problems. The Tiger II's 88 mm armament could destroy most Allied armoured fighting vehicles at a range far outside the effective range of the enemy AFV's armament. Also, notwithstanding its reliability problems, the Tiger II was remarkably agile for such a heavy vehicle. Contemporary German records indicate that it had a lower ground pressure and was as maneuverable as the much lighter Panzer IV.
Also, like the Tiger I, its sophisticated suspension design provided excellent flotation, giving the tank a very smooth ride and making it an excellent gun platform. The tank's reputation as an unreliable, underpowered, and overly complex system is based on postwar testing of captured examples by the U.S. Army's ordnance branch.

Production
1,500 Tiger II were ordered, but total production reached only 487 units (1943 - 3, 1944 - 377, and 1945 - 107 produced). Full production ran from early-1944 to the end of the war.


![]()


![]()

.

| GENERAL DATA | |||
| Formal Designation(s) | Panzerkampfwagen VI Ausf. B, Tiger II (SdKfz 182), Königstiger, VK4503 | ||
| Manufacturer(s) | Henschel | ||
| Production Quantity | 489 | Production Period | Jan. 1944 - Mar. 1945 |
| Type | Heavy Tank | Crew | 5 |
| Length /hull (m) | 10.3 | Barrel Overhang (m) | 3.00 |
| Width /with skirts (m) | 3.76 | Height (m) | 3.08 |
| Combat Weight (kg) | 70000 | Radio Equipment | FuG5 |
| FIREPOWER | |||
| Primary Armament | 88mm KwK 43 L/71 | Ammunition Carried | 72 |
| Traverse (degrees) | Hydraulic (360°) | Elevation (degrees) | -7.4° to +15° |
| Traverse speed (360°) | n.a. | Sight | TZF9b, later TZF9d |
| Secondary Armament | 2 x 7.92 mm MG34 (coaxial, bow) | Ammunition Carried | 5850 |
| MOBILITY CHARACTERISTICS | |||
| Engine Make & Model | Maybach HL230P30 | Track Links | 96/track |
| Type & Displacement | V12, 23.9 liters | Track Width | 80 cm |
| Horsepower (max.) | 700hp@3000rpm | Track Ground Contact | 413 cm |
| Power/Weight Ratio | 10.0 hp/tonne | Ground Pressure | 13.7 psi |
| Gearbox | 8 forward, 4 reverse | Ground Clearance (m) | 0.49 |
| Fuel | Gasoline (Petrol) | Turning Radius (m) | 4.8 |
| Range on/off road (km) | 170/120 | Gradient (degrees) | 35° |
| Mileage (liters/100km) | 601 on/863 off road | Vertical Obstacle (m) | 0.85 |
| Fuel Capacity (liters) | 1036 | Fording (m) | 1.63 |
| Speed on/off road | 35-42/14-30 km/h | Trench Crossing (m) | 3.00 |
| ARMOR PROTECTION | ||||
| Armor Detail | Front | Side | Rear | Top/Bottom |
| Hull | 100mm@40° | 80mm@90° | 80mm@60° | 25-40mm@0° |
| Superstructure | 150mm@40° | 80mm@65° | - | 40mm@0° |
| Turret | 180mm@81° | 80mm@69° | 80mm@69° | 40mm@0-12° |
| Mantlet | 100mm@Saukopf | - | - | - |

![]()
![]()

On December 17th, men from Battery B of the 285th Field Artillery Observation Battalion were ordered to move from Schevenhutte, near Aachen, to St Vith in the Ardennes. Their route took them near to the town of Malmédy. On their journey, on the N-23 St Vith road that passed to the east of Malmédy, Battery B met up with Lieutenant-Colonel David Pergrin of the 291st Engineer Combat Battalion.
Pergrin had heard that the Germans were along the route which the men from Battery B were taking. He advised them to take a different route to St Vith. However, the officers in charge of the battery decided that they had their orders and, ignoring Pergrin's advice, continued along their designated route.
This journey took them to what the locals called the 'Baugnez Crossroads' - two miles south-east of Malmédy. In fact, there were five roads there and to the Americans it was known as 'Five Points'. A military policeman - and previously placed route markers - directed the convoy along its way.
About half-a-mile from the 'Baugnez Crossroads', the first vehicles in the convoy were fired on by two tanks from the 1st SS Panzer Division led by Joachim Peiper. This unit was one of just two units in the whole Nazi military allowed to use Hitler's name in its title - the 1st SS Panzer Division Leibstandarte Adolf Hitler. This unit had a fearsome reputation and Peiper was known as a man who would let nothing stand in his way of success - including the taking of prisoners. In the Russian campaign, Peiper's unit was known as the 'Blowtorch Brigade' for its violence towards civilians.
On this day in particular, it is said that Peiper was in a particularly foul mood as his advance had not been as successful or as swift as he had hoped. Though the 1st SS Division had suffered few casualties in terms of manpower, it had lost tanks and half-tracks in its advance as the US 99th Infantry Division had put up a far stronger resistance than Peiper had bargained for.
The two tanks that fired on B Battery were under the command of SS Lieutenant Werner Sternebeck. He had lost five of his seven tanks in the advance. Peiper, it seems, was furious at yet more delays to his advance.
Clearly outgunned by the Germans, the men from B Battery surrendered after Sternebeck's attack. Peiper himself went to the Baugnez Crossroads and brusquely ordered Sternebeck to move on. The 113 American prisoners-of-war who had survived the attack were assembled in a field near the Café Bodarwé at the crossroads - this figure included eight Americans who had already been captured by Peiper. A young Belgium boy witnessed what happened next.
At about 14.15, soldiers from the 1st SS Panzer Division opened fire on the 113 men who were in the field. The firing stopped at about 14.30. Soldiers from Peiper's unit went around the field and shot at close range anyone who seemed to be alive - or clubbed them to death as later autopsies showed. Incredibly, some prisoners did get away after feigning death. It was three of these escapees that came across Pergrin.
Near Five Points, three Americans rushed up to Pergrin. It was these men who first alerted the Americans that something had gone on at the crossroads. Pergrin took the wounded men to Malmédy and at 16.40 contacted the First Army's headquarters to inform them that some sort of massacre had taken place at Five Points.
Because of the nature of the Battle of the Bulge, no one side could claim the land that the dead men lay in. It was only from January 14th, 1945, on that the Americans could lay claim to the area around the crossroads and claim the bodies. 71 snow-covered bodies were recovered. The freezing weather had done a lot to preserve the bodies and that made the autopsies easier, especially as some had been covered in snow.
On December 17th, 21 survivors of the massacre made statements to the American authorities in Malmédy. Their accounts were remarkably similar despite the fact that they had had little time to discuss their experiences.
When the massacre took place, Peiper had left the area around Five Points and had moved on. He was not at the scene when the shooting started. However, on December 12th, it is said that Hitler had issued an order which stated that no prisoners were to be taken and that a "wave of terror" was to descend on the Allies who stood in the way of the offensive.
However, in the trial at Dachau no written evidence was produced to substantiate this and, as evidence, the court ignored it. Also Peiper's men had taken prisoners in their advance prior to the Malmédy incident. So what happened?
The sheer number of prisoners almost certainly sealed the fate of the Americans. Over 100 prisoners could not be left where they were - in the field. But there was no spare capacity for the Germans to guard them as Peiper had ordered the SS units under his command to speed up their advance.
They could not be sent marching back towards the German lines as Peiper only had control of one main road and his unit was using it. Any men marching in the opposite direction could easily clog up the road. Peiper's other worry was that he might be attacked by American units known to be in the area.
Two theories have been put forward to explain what happened.
The men were deliberately murdered in cold blood. Certainly, the 1st SS Panzer Division had been responsible for atrocities in Russia and they had already shot captured Americans in their advance in the Ardennes Offensive - and more were shot after Malmédy. It is possible that Major Werner Poetschke, who commanded the 1st SS Panzer Battalion, gave the order - but no evidence has proved this, just rumour.
Other Germans heard the firing, but were not aware that the targets were three Americans as opposed to all of the group. Either trigger-happy or simply battle-hardened, they opened fire on the group as a whole. In October 1945, an American soldier made a sworn testimony that he had escaped with two other men (who were killed) but he had survived and made it back to US lines. The law as it stood then would have allowed the Germans to shoot at escaping prisoners - but not at the whole group. It is possible that their escape precipitated the shooting of the other men.
In May 1946, Peiper had 70 of his men were put on trial. The charge stated
That they willfully, deliberately and wrongfully permit, encourage, aid, abet and participate in the killing, shooting, ill treatment, abuse and torture of members of the armed forces of the United States of America."
Forty-three of those accused were sentenced to death and the rest received prison sentences. The death sentences were commuted to prison sentences and all the men were out of prison by the end of 1956.

11. SS-Oberstgruppenführer .Josef Dietrich 33. SS-Brigadeführer. Fritz Kramer
45.SS Gruppenfuhrer .Hermann Preiss 42. SS-Standartenführer.Joachim Peiper
![]()


![]()
![]()


